
Vintage Lamp Makeover
So you want to take your lamp, wall light or old porch scone to a new level. This step by step tutorial should walk you through a vintage lamp makeover with no problems. With a little elbow grease, a little time and a goal to make something beautiful, you have no problems revamping something old into something new and gorgeous. Awesome enough to use it in your wedding decor.
Well, I did just that with these two old porch scones my son and hubby grabbed for me from a pile of trash someone had put out for pick up. It’s easy to change the complete look and I could have done several things with these, but decided to go with the distressed off-white look. Here’s what you do….

STEP ONE : Locate a lamp.
Of course, the first step is to locate an old lamp, scone or wall light if you don’t already have one. Check out thrift stores. Very often there’s something great to be found at a thrift store. You can also look for garage sales or sales on Facebook Marketplace. If you don’t find something right away, don’t give up! What might not be there today may very well be your best find tomorrow.
STEP TWO: Strip all glass and wires off.
Remove the lighting parts of the fixture (These two are actually wall scones. If yours is a true lamp, this step is not needed). That means the glass globe, if there is one. The fixture that holds the bulb. And finally the wires. Most of the time you will only need a screwdriver and something to cut the wire.
STEP THREE: Let's clean them up.
Oh my, the scones I worked with were DISGUSTING! They were dirty and when I unscrewed the light fixture, there were dead beetles. Like lots of them. If yours are like that, no worries. Just put on some rubber gloves and give them a good wipe with a wet wash cloth, or immerse the whole thing in a bucket of water and scrub away.
STEP FOUR: Make a decision.
Now is when you decide the look you are going for with this lamp makeover.
*If you like the way it looks all cleaned up then no more cleaning. If it has patina, like mine, and you want to let some of that show through then no more cleaning.
*If you want to paint it, then you need to go a step further to insure that the patina does not bleed through your paint and give you a color you really don’t want. Once the initial dirt is gone, you still need to clean it with a good brass,,copper, steel, chrome, aluminum cleaner such as Never-Dull or Brasso. NOTE: this is a chemical, so you need to wear gloves or your fingers will turn black from the reaction to the metal while using it.
To use most cleaners, you simply apply give it a little scrubbing with a rag or toothbrush then wipe or wash off.
STEP FIVE: Time to paint.
You’re ready to paint. More than likely you’ll need more than one coat. Get your paint ( I used acrylic white) and brush and start painting. I chose to keep the inside that nice metal color, so I only painted the outside panels. Let it dry completely between coats. Apply as many coats as you need to get the look you want.
STEP SIX: Distress it or leave it.
All your paint is dry. Should you like it like that, simply leave it alone. To distress it take a piece of sandpaper and gently hit the edges that would naturally be worn. This is usually the edges and corners along with anything that may stick up like a rivet or screw.
You can also opt to use a little dark finishing wax. I used this.

This helps with that old white, worn look and also acts to seal your paint job. Dip your wax brush or rag into the wax and apply generously all over the entire lamp. Then with a clean rag, simply rug off the excess. Whalla! A beautiful worn look any vintage lamp makeover project Do It Yourselfer would be proud of.
STEP SEVEN: Replace the wiring and glass.
Time to replace the lighting part of the light if you are going to rewire it. You can also just put a candle holder in or simply plan to cover the hole with flowers. I had my wonderful husband rewire mine and then we added the light bulbs that flicker so that it would look more like a lit candle lamp than a light fixture. That’s completely up to your liking.
STEP EIGHT: Add some lace.

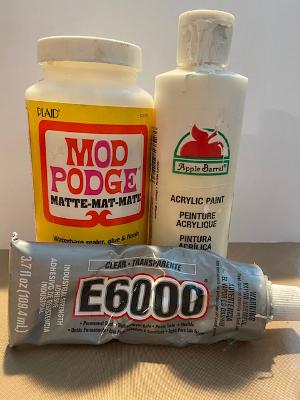
To add lace ( I did to the top of mine.), measure the space that you want the lace to go. Cut the lace. Don’t worry if it’s a little bigger than you’d like. You can always trim it after the glue dries. Using Mod Podge gives a good no see look. Paint the area where you want the lace to go with the Mod Podge. Lay the lace on top. Now carefully paint another layer of Mod Podge being sure to cover all the lace. Let dry. Once dry trim up the lace edges if need be.
When I did this step, the top of my vintage lamp turned green because of the patina that was on the copper tops. Apparently I didn't get all the patina with the Brasso and the Mod Podge made the patina bleed through the lace. No sweat though, I just painted over it when it was dry. If this happens to you, simply be sure your Mod Podge is throughly dry, then paint over any discoloring you don't like.
STEP NINE: Cover the Seams.

To cover the edges of the lace, take some nice edging, garland, or beads and hot glue or E600 glue them to the seam. Here I used a string of plastic iridescent pearls (Some old Mardi Gras beads from last years parade.) and hot glued them on. I also used a ribbon edging with little crystals for the top seam.
STEP TEN: Embellish.

I wanted a little more oomph, so decided to add these little wooden scroll pieces that I got from Michaels to the sides.

After painting them white, I just glued them to the glass using E6000 glue.
I thought the light fixture looked a little plain, so I hot glued a string of plastic pearls around it. Big improvement!
Feel free to embellish yours how ever you think you’d like them. Some of us are more minimalist than others. It’s completely up to you.

STEP ELEVEN: Add flowers.


No vintage lamp makeover would be finished without a few flowers. You can fill it right before your wedding day with lush fresh flowers or do like I did and use silk. I used these great silk Babies’ Breath, eucalyptus leaves, some ivy leaves I had laying around and these Gorgeous little chiffon flowers that have pearls in the center. Loved the little chiffon flowers because they carried the pearl look from the string of pearls up top to the inside bottom to balance the whole look out. The color of the wedding I was to first use these in, was pink, so I simply added a pink rose to the inside. I did not glue it in because I wanted to be able to change the rose out for different colors or a different kind of flower depending on the wedding colors of my next event.

FINISH: Our Vintage Lamp Makeover
There you have it. A vintage lamp makeover.....Simply beautiful!


Now I know some of you are saying, “I don’t know if I can do this wedding lamp revamp myself”. You can! It’s an easy project. The only thing that may take a little more effort is replacing the wiring if you so choose, but my husband assured me that it’s not a difficult job. I’m adding this little video I found on Youtube to walk you through it if need be.
Hope you try this simple lamp makeover project. You won’t be disappointed in the end if you do. A DIY wedding lamp is in your reach. It’s less expensive than you might think and would make a great decoration for your house or porch after the wedding.
Have fun!
Share Your Real Wedding Story
Do you have a great wedding story? Share your wedding planning story with us, we'd love to hear it!


Free Book with Free Newsletter Sign Up
Sign up for our free newsletter to get your free copy of our groom's ebook. What's a man to do?

